PIXI BEAUTY ON-THE-GLOW BLUSH TINTED MOISTURE STICKS REVIEW (BLOGTOBER – DAY TWO)

Post contains gifted products. All views are my own.

I will admit to never having been anything but a powder blush kinda gal my whole life but when these beauts landed at my door I feel like a door was opened that I can not and will not ever close.

Formulated with Ginseng, Aloe Vera and a unique mix of Fruit Extracts, this tinted balm provides a hint of natural colour while hydrating and conditioning skin.

pixibeauty.co.uk

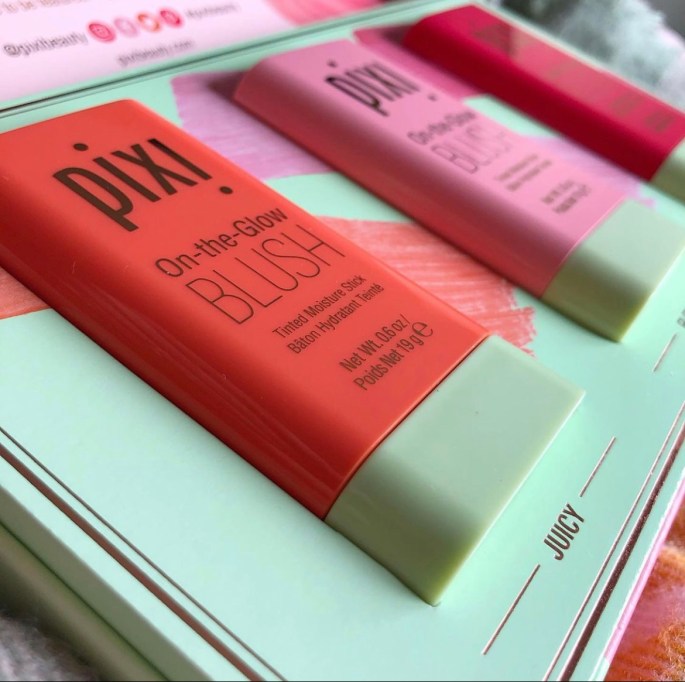
Packed with vitamins and antioxidants as well as intense (but easily blended) colour pay off the Pixi Beauty On-The-Glow Blush Tinted Moisture Sticks have become a staple in my everyday routine.

Available on three shades…

• Juicy (a gorgeous pop of orange)
• Fleur (a subtle rosey flush)
• Ruby (a vibrant raspberry)

…and costing £18 (which may seem steep I guess but a little goes a long way!).

Completely cruelty free and multipurpose which make things a whole lot easier in the morning when you’re in a mad dash to get out of the door. Just swipe across the cheeks and finish with a quick dab on your lips and your good to go with a beautifully pulled together makeup look.

Below you’ll find guidance straight from the Pixi Beauty website on how to apply your new favourite blush!

• Step 1: Twist base to wind up or down.
• Step 2: Swipe gently onto skin.
• Step 3: Blend with fingertips.
(Although I actually prefer to use a stippling brush.)
• Step 4: Close lid after each use.

I’ve mentioned before (only a couple hundred times) how oily I am and I think that’s why I have previous steered clear of anyone but your big standard blush. I was worried initially that the formula would sit horribly on my sometimes hard to work with skin but honestly those fears were so unwarranted.

They blend beautifully and have wonderful longevity. The thing I find most fascinating is that you can apply on top of your setting powder and they still look dewy without disturbing anything else underneath.

Couldn’t rate these more highly!

KELLY’S TOP 5 LIPLINER, TIPS, TRICKS & HACKS (BLOGTOBER – DAY ONE)

The right lipstick can completely change not only your appearance but your whole mood. You can find a shade for every skin tone, occasion and season but with that you’re going to need the perfect lipliner (and application!) because without the finishing touches life is just a bit bland, isn’t it?

Here are my top 5 tips for how to get your liner to work for you with minimal effort (because I’m an enthusiast, not an MUA and I like life to be nice and simple)!

1. Switch things up!

First up is my absolute go to, holy grail of all liner tips. Apply your lipstick first and finish with a liner. I know it seems quite contradictory to what you’re trying to achieve but trust me! It’s fool proof and will make the world of difference to your perfect pout. You’ll have already done the work with your initial application which will leave you with the fun part of defining your best features (so all of them basically because YOU ARE A SNACK!) as well as simultaneously cleaning up the edges. You’re also onto a winner when your lipstick starts fading because you won’t be left with any unflattering rings or lines around your lips.

2. Prep.

Exfoliate, exfoliate, exfoliate! Flaky lips? We don’t know her!

The last thing you’ll want is for your liner to cling to dry patches and dead skin. Firstly it’s not going to feel very nice and secondly they’re just going to be so much harder to work with. A sugar scrub is a quick and easy way to maintain soft, smooth lips with minimal effort and really will make all the difference.

I’m sure it goes without saying that dry lips should not be a feature here! However, as much as a slick of balm is going to help you achieve a much more kissable pout and help to prevent a liner dehydrating your lips it can also make things a little more complicated when trying to control your liner. I like to prep with a balm during my skincare routine so that by the time you’re ready to apply your lipstick everything has dried down enough to be able to retain some control.

3. Contrast can be key!

The power of a good lipstick and liner duo is that the possibilities are endless and it really is so easy to completely change the appearance/shape of your lips with a few little switches. By using contrasting shades (a darker liner against a lighter lippy) you’ll easily be able to fake bigger, plumper lips and I’m all about that life.

4. Out with the new and in with the well, nearly new…

As silly as this is going to sound a brand new liner can be your worst enemy if you’re a novice (or messy like me!). I’m not saying we want a blunt tip but a little bit of wear and tear makes a huge difference. You can also flatten the tip of your liner by warming it in between your hands before squeezing gently. This will be so much easier to work with. Trust me!

Whilst we’re on the subject of what makes a good liner application I also wanted to mention angles. The way you hold your liner is going to make such a huge difference to the finish. The most commonly recommended method would be to hold your line at a 45-degree angle (now I can only speak for myself when I said ‘erm, what?’ then again I was always rubbish at maths.) but to be honest I think really it’s something that just needs a bit of tweaking. Trial and error, you know!

5. Slay all day.

If staying power is what you’re after then this is one for you. Fill in the entire lip with the liner to create a base for your lipstick or gloss. It can be drying but with the correct prep you’ll achieve the kind of longevity that seems suspiciously close to magic.

…and that’s it! I hope you’ve been able to pick up a few tips and tricks or at least feel a bit more confident when tackling a statement lip now!

HOW TO GET THAT PERFECT DEWY MAKE UP LOOK THAT LASTS EVEN WHEN YOU’RE OILY AF

Guys, my skin is OILY. I’m talking make up sliding off of my nose an hour after application kind of oily, and that’s fine. We can combat that with a good base and matte products which is great. However, if you’re like me then sometimes you just don’t want a full face of heavy slap. You covet the fresh faced dewy goodness you see on Instagram. 

Here I’m going to share with you some tips, tricks and products I’ve picked up in my search for a glowy complexion and hopefully they will work for you too!

Just a quick disclaimer, I’m not an MUA but these steps definitely work for me and I am an oily disaster.

Hydration

Hydration is KEY! I know that sounds bizarre because when you have oily skin it feels like the last thing you might need but trust me.

Drink plenty of water. 6-8 glasses a day is the current recommendation and it is so vital so your overall health and well being. I like to add a couple of slices of lemon to mine to give it a little extra something.

Hyaluronic Acid is also something you might want to think about. I know that sounds scary but I explain exactly what it is and the benefits of adding it to your skincare routine HERE.

It doesn’t have to be expensive, there are plenty of brands on the HA bandwagon now so you can purchase anything from a toner to serums and even a refreshing facial mist. The choice is yours. A good skincare routine is so important but does take a while to get to grips with as everyone has different concerns.

Base

A good base and knowing what products to use is going to be your best friend. It’s taken me ages to work out what does and doesn’t work for me but I think I’m finally there and my advice is don’t be afraid to mix products.

Most of us aren’t oily everywhere. If you really think about it you’ll realise the problem lies within certain areas. Mine is my t-zone. 

Basically I use various products in different areas of my face. I know that my nose is my biggest issue so I use a touch of the PLouise Base (£10) to really prime that area before applying my foundation and honestly I haven’t found anything else that does the trick as well as that little gem! 

My favourite dewy foundation at the moment is the Revolution Conceal and Hydrate. It has such a beautiful finish and is a bargain at just £9. I apply this with blending sponge carefully to avoid anywhere I have just laid down my PLouise Base. I then go back in once I have blending all of the product elsewhere and apply the tiniest bit of matte foundation (the best I have found is the Revolution Matte Base) to my problem area to add a touch more coverage and cover the base. The trick with oily skin is less is more and to really take your time with blending and pushing the base and foundation into the skin. It really does make all of the difference.

You’ll then need to set it all. I’m still on the hunt for my ideal powder but at the moment I’m quite liking the Collection Primed & Ready HD Blur Setting Powder (£3.99). A little goes an extremely long way so please be careful! It’s slightly pearlescent so really helps to give your skin some life and stop it from looking flat.

Finishing Touches

These are the things that are going to make the most difference overall in my opinion. You’re going to need a bronzer, blush and highlighter. Any brand will do! I then highly recommend you check out this video by Jamie Genevieve for some application tips when it comes to these specific products because she has changed the game for me!

Finish off with a dewy setting spray and whilst your face is still damp I want you to apply a little bit more of your highlighter in the usually places but also to the top of the apples of your cheeks. This step is going to make all the bloody difference when it comes to getting that glow especially now you have your base down!

I hope you have found this post helpful! Fingers crossed you can take something away from it and be able to live your best life with the dewy skin of your dreams!

HOW TO ROCK THAT PERFECT BOLD RED LIP

Beauty, to me, is about being comfortable in your own skin. That, or a kick-ass red lipstick.

Gwyneth Paltrow

What does a bold red lip mean to you?

To me it can not only pull a whole outfit together but also completely change my state of mine. I go from feeling like an anxious wreck to all of a sudden having my shit together, ready to face anyone and anything. That’s the real power of make up.

Here are some tips and tricks on how to rock that red pout. Let’s face it, we could all do with a pick me up every now and then.

Hydration is key. Smooth, soft lips will make all the difference to the application and longevity of your new confidence maker. Incorporate a lip balm into your skincare routine if you don’t already use one. I also recommend using a scrub followed by a lip mask (the Bubu #youpucker Lip Pumping Mask is my fav!) once a week. The difference in your pout will speak for itself.

I have honestly lost count of the articles and posts I have read, all dedicated to the art of finding your perfect shade of lipstick. I know that there is a skill to picking the shade best suited to the under tones of your skin, I’m not disputing that and I could follow suit but I do try to be different! 

My biggest piece of advice? Ignore them all! You find the shade that makes you feel like a bad bitch and wear it with pride. That confidence is what makes the shade perfect for you.

In regards to the rest of my make up I like to keep things fairly simple and neutral. A red lip is a statement, let it speak for itself. Having said that, you can never go wrong with a bit of eyeliner. A flick sharp as your wit is the perfect accompaniment to a bold lip.

When it comes to lip liner I like to break the mould slightly (a lot…). I apply my lipstick first and liner second. I find it much easier to work with and is the perfect way to clean up and define the shape of your lips.  That’s just my experience though, you do you!

Do you want to go that little bit further and really amp things up? Pop a little bit of highlighter right onto your cupids bow before applying your chosen lipstick. It’ll make your lips appear bigger.

Last but not least a few of tips to finish off the look. Lipstick on your teeth is not a good look for anyone. Put a finger in between your lips (basically inside your mouth) and pull slowly. This will remove any lipstick on the inside of your lips. Also, don’t forget to blot. Just grab a piece of tissue, place it between your lips and bounce them up and down a couple of times. This will stop the product ‘bleeding’ and keep the lines clean. A matte finish is my absolute favourite but nothing says luscious like a gloss! A quick slick over the top of your favourite lipstick really is a game changer.

I mentioned earlier that the perfect shade for you is the one that makes you feel the bravest. I stand by that 100% but just incase you’d like some guidance here are some of my favs!

Beauty BLVD Mattitude Lip Liquid Shade – ‘Vicious’

This baby is sooooo long lasting (I’ve been caught in the rain and it still didn’t budge).

Carter Beauty Word of Mouth Lipstick – Shade ‘Bey’

Probably my most worn and if I’m being biased my favourite! It’s just really classic, feels comfortable to wear and never bleeds.

Urban Decay Comfort Matte Vice Lipstick Shade – ‘Bad Blood’

My forever faithful old friend and probably the red that truly started my obsession. A matte finish that is comfortable to wear and makes me feel fierce AF.

Huda Beauty Liquid Matte – Shade ‘Heartbreaker’

A statement red if ever there was one. It does dry down to a matte finish super quickly but doesn’t feel tight or dehydrating.

I hope you have enjoyed this post and now have the confidence to wear your dream shade with pride.